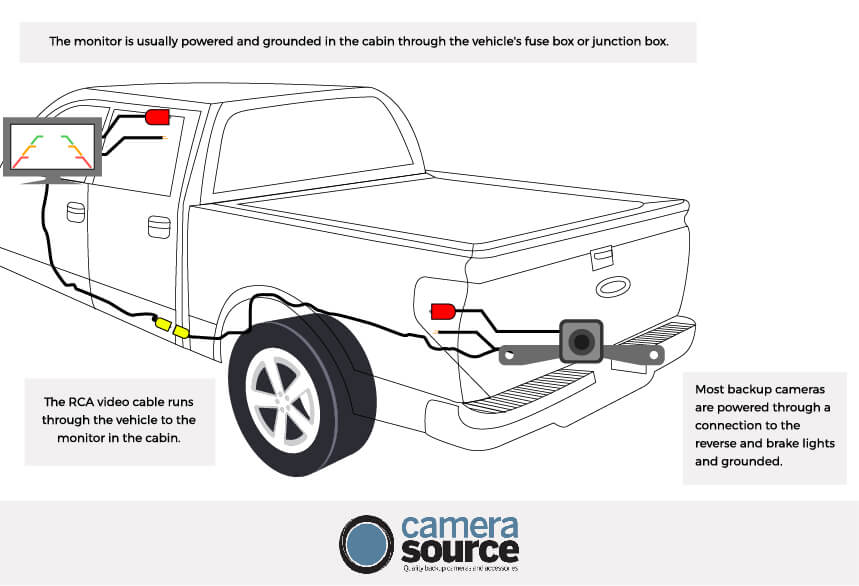
Installing a backup camera on a Ford F-250 is not too different from installing one on a Ford F-150. If you’re relocating the current camera to a different location on the truck, a wiring diagram is helpful to know how to run the wires between the camera mount and display, and how to power them.
If you’re reading this, you probably already know that Ford F-250 wiring diagrams can be hard to come by. Wiring diagrams can be found in the vehicle’s service manual. Wiring diagrams vary by model year, so you need to purchase the service manual for your specific model year. Since this is the case, the instructions found below can be a basic camera installation guide for your truck. Good backup camera providers, like ourselves, will also provide in depth instructions for you.
Even without the wiring diagram for your Ford F-250 model year, Camera Source can help you get the right equipment with detailed instructions for easy DIY installation. If installation seems like a daunting task, we have wireless cameras too! Keep reading for camera installation instructions for a Ford F-250.
What’s Your Reason for Installation?
Before you can start, you need to have a sense of where the camera is going to go. You might be relocating your current camera, replacing a broken camera, adding a new monitor or additional location— there’s a lot of options. The process of installation will vary based on the type of installation, i.e., the relocation, the replacement, or the addition of cameras or monitors.
Common reasons for using a wiring diagram include but are not limited to:
- Adding cameras to improve safety
- Relocating a factory standard camera to a better position
Camera Location
If you plan to relocate your current camera or add another camera, knowing the location can help you select the right kind of camera. There are several different places to mount a Ford F-250 backup camera, here are the most common locations:
- Rear cameras are the most common type of camera, and for good reason. Being able to see the rear of your vehicle as you back up has numerous benefits, which is why most vehicles come standard with them now. Rear cameras can be placed in a number of locations: Cargo/3rd brake light, utility beds, license plates, tailgates, or a recessed surface.
- Front cameras, on the other hand, are often for more specialized use. Most commonly, they are employed as dash cams by law enforcement, but they can have other uses, for instance to monitor a winch or a vehicle with low ground clearance.
- Likewise, side cameras are useful supplements to rear mirrors and cameras. They can be combined with blind spot sensors for enhanced safety.
If you’re relocating, replacing, or adding cameras to any of these mounting points, the F-250 wiring diagram will be helpful for installation.
Materials & Tools
To start, you’re going to need the right camera. Camera Source is your best source for this, no matter what type of camera you’re looking for.
Cameras for the Ford F-250
There are several different categories of camera, but most commonly, you want to tailor the camera to your expected use.
- Factory Tailgate - Usually, in newer models, the backup camera is mounted on the factory tailgate, so starting there is a great place to begin when thinking about a repair or replacement. There are even backup cameras in a Ford emblem and tailgate handle cameras.
- Factory 3rd Brake Light - 3rd brake lights are often added to a vehicle as a supplement, and they can also be a convenient place to add a backup camera, as they’ll share wiring infrastructure.
- Front Grille - The front grille is a great place for mounting a camera and is often common for front-view cameras.
- Side Cameras - Side mirrors can be a useful place to mount a monitor or add cameras above and below for better coverage of the side of the vehicle.
- Universal Cameras - If you can’t find just the right fit, universal cameras have the flexibility to fit your unique needs.
- Wireless Cameras - We have wireless cameras too if installation seems like a daunting task.
If you’re looking to go with a full upgrade, there are multi-camera kits available, including ones that supplement utility beds and campers and 5th wheel trailers. Figuring out how you want to use the camera is important to identifying the right kind of monitor.
Displays & Monitors
The other key component of a backup camera installation is considering your display. Are you using the factory display or an aftermarket monitor? Installing a camera can sometimes involve more than just replacing the camera— you might need to insure compatibility between the camera and the display. Luckily our wiring kits take care of the problem. They can be helpful to novice mechanics or older vehicles that aren't already equipped with cameras.
There are options for using an existing factory display, aftermarket displays, or camera kits that come with their own displays. If you want to unclutter your dashboard, you can switch to a rearview mirror monitor.
Once you have your camera, monitor, and wiring kit, you’ll need the following tools for installation:
- Trim tools
- Flat blade screwdrivers
- Hex and star sockets
- Wire strippers
- Pliers
- Electric tape
- Heat shrink
- Wire ties
- Soldering gun and solder
How to Install a Backup Camera on an F-250
Instructions will vary based on your vehicle and the type of camera and monitor you're working with. Here are some additional helpful resources if this is a first-time install:
- Beginners’ Guide to Backup Camera Installation
- Powering Your Backup Camera
- Installing a Side View Camera
- Installing Wireless and Wired RV Backup Cameras
- Adding a Backup Camera to an Older Car
Step 1: Run The Wires
- Run the camera and power cable through the hole into the interior of your car.
- Locate the reverse light wires for your car. This is a tricky step, and you want to make sure that you do a good job. This is how to connect a backup camera to the reverse light. Make sure to double check your owners manual to ensure you’ve located the right one.
- Strip the positive and negative wires on your reverse lights (make sure your car is powered off before you do this).
- Using a small screwdriver, separate some of the strands of the stripped wire, and splice in the power cable for your backup camera to them. Usually you can do this by looping the wires together.
- Make sure positive is connected to positive and negative is connected to negative. Once you’ve done this, cover everything in electrical tape.
- Connect the RCA cable to the camera’s cable, and run it all from the trunk to the fuse box area at the front of the car. This is usually located to the bottom left of the steering wheel. You can conceal the cable underneath the ceiling panels of your vehicle if you want to peel them back, or if you don’t care about aesthetics, just attach it to the ceiling of your car.
Step 2: Mount The Display
It may be one that mounts to your rearview mirror or one that mounts to your dashboard. In either event, following the mounting instructions that come with the device is your best bet. If all else fails, this backup camera installation guide can be very helpful.
Connect the RCA cable to the RCA output on the monitor. You may also need to run a trigger wire up to your monitor, or even power it through the same source as the backup camera. (Again models will vary.)
If the monitor requires it, you’ll likely need to install a fuse tap, which will allow you to connect the bare wiring of your monitor to the power of your fuse box. See the guide linked above for good instructions on how to do this.
Step 3: Mount The Camera
If you haven’t already created mounting points for the camera, now is the time to do that. Once you’ve made the appropriately sized holes, mount the camera itself to the surface, and connect the appropriate wires (RCA and power) according to instructions provided, and you should be ready to go!
Camera Source for Backup Cameras
No matter what kind of backup camera you’re looking for, Camera Source has you covered. Get in touch with us, or start browsing our products today.


