Need Help? 888.844.9763

Industry News

How to Weigh a Boat Trailer

So you need to weigh your boat trailer. Maybe it’s for registration purposes (similarly to a utility trailer), or maybe it’s to make sure you don’t overload your rig (similarly to a roof rack or SUV) for a safe trip. 

So, how do you weigh a boat trailer? Well, there are a number of ways to make the weighing magic happen, and in this article, we’ll cover all the different ways to get the job done. 

While you’re on the topic of your boat trailer weight, you should also think about its safety on the road, and consider installing a backup camera. Camera Source has the backup cameras and front and side cameras that make loading, hitching, hauling, launching, and parking your vehicle and boat trailer safer and easier. Keep reading for more tips and tricks to make loading your boat trailer safe and easy. 

Option 1. Calculate Boat Trailer Weight Based on Capacity Plate

Your boat trailer should have a capacity plate listing the Maximum Capacity, Gross Vehicle Weight Rating (GVWR), and Gross Axle Weight Rating (GAWR). According to Boat.U.S., it should look something like their below example:

To find the weight of the trailer, simply subtract the trailer’s maximum capacity from the GVWR and you're left with the weight of the trailer. 

On average, boat trailers weigh anywhere from 200 lbs to 1,600 lbs.

  • Single-axle boat trailers typically weigh up to about 600 lbs and have a capacity up to about 3,300 lbs.
  • Tandem-axle boat trailers usually weigh up to around 1,000 lbs. Some tandem-axle trailers can support boats up to around 8,000 lbs, but this is the weight at which you'd consider a triple-axle trailer.
  • Triple-axle trailers usually weigh between 1,000 and 1,600 lbs. These trailers are designed for heavy-duty boats around 8,000 lbs to 10,000 lbs.

If you’re uncertain about your calculation, here are average boat trailers weight and capacity by size for a frame of reference: 

Trailer Boat Size

Trailer Weight Capacity

Trailer Weight

12 to 14-foot boat

400 pounds

150 pounds

15 feet boats

1,500 pounds

410 pounds

20-foot boats

6,000 pounds

1,000 pounds

18-foot boats

3,100 pounds

630 pounds

18-foot boats

1,800 pounds

420 pounds

22-foot boats

4,800 pounds

980 pounds

24 to 25-foot boats

6,425 pounds

900 pounds

25-foot boats

8,600 pounds

1,320 pounds

24 to 28-foot boats

7,000 pounds

1,630 pounds

If you’re skeptical of the capacity plate and math skills to determine your boat trailer weight, then it’s time to weigh it. 

Option 2. Weigh Your Boat Trailer on a Truck Scale

The simplest and fastest way to weigh a boat trailer is to take it to a truck scale. Locations capable of weighing trucks and boat trailers include but may not be limited to:  

  • Truck stops 
  • Weigh stations
  • Junk yards 
  • Landfills 
  • Gravel yards 
  • Freight yards 
  • Grain elevators 
  • Grain and feed stores 
  • CAT scales 
  • RV lots

Many locations have the ability to weigh your trailer, just make sure you call ahead first to ensure that they have the availability so you can weigh it. 

Option 3. How to Weigh Your Boat Trailer at Home

If you don’t have a weigh station nearby, don’t worry, you can also weigh your trailer with, funnily enough, a bathroom scale. Here’s a step by step guide of how to weigh a boat trailer at home with a bathroom scale:

Step 1. Level out the trailer

Being level is important when getting an accurate weight. Make sure that the wheels are chocked so the trailer cannot roll.

Step 2. Prepare the ground

  • Take a reliable board, like a 2x4, and place it directly below the trailer’s tongue. The board needs to be at least 3.5 feet long for this to work. 
  • Place the bathroom scale roughly 2 feet in either direction from the trailer tongue, and a block or brick about 1 foot from the trailer tongue the opposite end from the scale. You’ll want to protect the bathroom scale with a small piece of plywood or other material on the top.
  • Insert two horizontal pipes between the 2×4 and scale/brick: one in the center of the bathroom scale and one in the center of the brick.

Step 3. Weigh it on the Scale

Lower the trailer jack until the coupler is fully resting on a vertically-positioned pipe. Read the scale and multiply by 3. The average bathroom scale can’t do the entire weight, hence the multiplier. 

Weighing a Boat on a Trailer at Home

If you happen to find yourself needing to weigh the boat trailer with the boat still on it, the process of weighing a trailer on a bathroom scale can also provide the weight of the boat while keeping the boat on the trailer the entire time. 

Repeat the above process, but now record the weight. 

Next, slide the boat aft on the trailer 12" to 18". You must measure exactly how many inches you moved it, and record that. With the scale in the same location under the tongue, record the new scale reading. 

Finally, measure the distance in inches between the trailer axle (wheel centerline) and the point on the tongue where it touches the scale. You have then four measurements:

  • W1 = first (heavier) scale reading in lbs
  • W2 = second scale reading in lbs
  • X = the distance you shifted the boat in inches
  • C = distance between trailer axle and scale point in inches

The formula is: Boat Weight = C (W1-W2)/X

Now, there might be some error here, so if you don’t think you’re getting the right measurements, it might be prudent to take it to a weigh station. 

Eliminate the guesswork while hitching, loading, and launching your boat on the trailer and get a boat trailer backup camera instead!  At Camera Source, we have the tools and equipment to help you outfit your rig with whatever you need. Get in touch with us today!

How Much Weight Can A Roof Rack Hold?

Overloading a roof rack can cause serious problems. For this reason, the universal cap for a roof rack is roughly 165 pounds. However, how much weight a roof rack can hold starts with how much weight your vehicle can hold

Many people often forget that the weight of the rack itself and the crossbars need to be taken into account. Even if your roof rack has a dynamic weight rating of 300Ibs, but your car only has a dynamic roof weight rating of 150Ibs, then it means you’ll only be able to load a total of 150Ibs on your car roof.

In most cases, roof racks and crossbars are much stronger than the actual car roof itself and will have both a higher dynamic and static load rating. This, however, doesn’t mean that you will be able to add more weight onto your car roof —  in fact, quite the opposite. We’ll go even more into depth below. 

How Much Weight Can A Car Roof Support?

If you don’t have a roof rack, your car will generally be able to hold roughly 70-165 lbs of weight. You will also probably have to attach that weight using unconventional and unreliable means, such as bungee cords roping through open windows or using straps to tie something down to a bare of.

The permissible roof load of a vehicle is stated in the operating manual of the vehicle manufacturer. The roof load cannot be found in the vehicle registration document. Only the permissible total weight of the vehicle (empty weight plus maximum additional load), which may not be exceeded in total, can be found in the vehicle registration document.

How to Properly Load Your Car’s Roof 

The purpose of car roof racks is to expand the cargo capacity of vehicles rather than to increase the amount of weight the vehicle can transport. This means roof racks are designed to carry large bulky items that won’t fit inside a car or truck. 

If you are planning on mounting items such as a roof top tent or roof box to your car roof then it is necessary for you to install a roof rack or crossbars. Other items such as bikes and kayaks will also require you to have a roof rack or crossbars installed in order to make sure everything is securely attached.

How to Load a Roof Rack

To secure items to the roof rack, tie down the equipment with four points of contact. This will give you the most stability. While tying down the equipment, hold the straps tightly so you do not need to tie a bunch of knots. Wrap the straps around the equipment a few times, on all four areas, to ensure the equipment is properly secure to the roof rack.

Kayaks, surfboards, skis, bicycles, roof boxes and cargo baskets may all require specialty mounts that attach to the crossbars as well as additional gear to transport properly. 

  • Roof boxes - Extra space for all your gear 
  • Bike racks - Bikes of any kind – mount the bike rack quickly and easily
  • Water Sport Racks - Mount racks for kayaks, surfboards and SUP boards. 
  • Winter Sport Racks - Skis and snowboards – get ready for action in minutes.

Roof Rack Loading Do’s & Don’ts

Roof racks come in different forms and can accommodate many different forms of cargo, but they do have their limits. 

Roof Rack Do’s

  • Stay within your roof weight limits.
  • Avoid carrying unnecessary gear on your rack or crossbars.
  • Use proper cam straps to secure your load.
  • Carry bulky gear that can’t fit in your vehicle.
  • Carry dirty gear such as firewood for example.
  • Use the locks on your rack accessories as they serve as a backup to the securing mechanism.
  • Carry only aerodynamic gear on your roof rack/ crossbars.

Roof Rack Don’ts

  • Go over the roof weight/roof rack limits.
  • Use bungee cords or twine to secure your gear.
  • Load unnecessary gear on your roof.
  • Leave gear or rack accessories on your vehicle when not in use. 

What not to Load on Your Roof Rack 

Roof racks are very useful, but there are several things to avoid mounting on them. Don’t load mattresses, major heavy appliances, large furniture like sofas and bed frames, or anything that might be construed as illegal. Overloading a roof rack makes the likelihood of an accident much higher. 

Using Roof Rails & Crossbars

There are two main types of mounts that can help secure gear: roof rails and crossbars. The two are similar because cargo can be secured to both. Roof rails often are installed at the factory, and they run from the front to the back of the vehicle. Some roof rails are flush and some are raised. 

Crossbars attach to the roof rails on top of your car, running from side to side, and provide the mounting point for the system. Yakima and Thule sell crossbars for roofs without rails, and these attach to the edge of the roof so you can still mount things on top of the car. 

Both crossbars and roof rails have weight limits that are independent of the vehicle’s limits. For example, the static weight limit of a Yakima crossbar maxes out at 600 pounds.

Common Roof Rack Questions

What’s the difference between static and dynamic roof ratings?

The dynamic weight capacity of the roof refers to the amount of weight you can support on your vehicle roof while it is in motion. In other words, while you are driving. The dynamic roof weight limit is always lower than the static weight capacity as this is what will be affecting your driving dynamics while you are on the road. Exceeding the maximum dynamic roof capacity amount makes vehicle rollovers more likely to occur. Most vehicles have a dynamic roof capacity of 165 Ibs. 

Static weight capacity is how much your vehicle can support when not in motion. A general guideline is that static weight capacity is roughly 8 to 10 times greater than the dynamic weight capacity.

Can my vehicle carry the weight of my rooftop tent?

This will depend on how much weight will be in the tent when it is open and filled with people. Knowing the overall amount of weight that will be required to comfortably sleep in a rooftop tent, and comparing that to the load capacity of your vehicle will tell you all you need to know. 

Can a car roof hold a person?

Typically, yes, but people who exceed the weight rating should exercise care and try to stay over load points when they are on top of the vehicle. 

Camera Source for Safe Driving 

Using the extra space on your car roof can be greatly advantageous for turning your vehicle into a more useful tool. You can continue to enhance the safety of your vehicle by installing side cameras or with the addition of backup cameras. At Camera Source, we provide the tools and assistance necessary to make sure you have the right camera for your vehicle. If you’re curious about how backup cameras might help your vehicle, get in touch for more info. 

7 Tips for Safely Hauling Lumber in a Pickup Truck 

The average pickup bed is six to eight feet long. So how do you haul 16 ft lumber or even 20 ft lumber in your pickup truck? Rather than letting it haphazardly hang from your truck, use these tips to help you better understand how to transport lumber in a pickup truck, how to tie it down, and how to secure long loads. 

Camera Source is familiar with taking the extra steps to ensure safe driving, not only by providing the best backup cameras at the best prices, but also by helping drivers like you transport large loads like lumber with these tips.

1. Install a Backup Camera

Keeping an eye on the load is key to keeping safe and avoiding accidents when you’re moving lumber from place to place. In addition to a standard backup camera, installing a camera that can monitor the bed, like a third brake light backup camera or an adjustable surface mount backup camera, to ensure cargo stays where it needs to be for the journey can give you peace of mind. Installing a side camera can also be helpful in these instances of oversized loads to help you monitor their clearance and avoid a collision. 

2. Always Use Ratchet Straps

Ratchet straps are strong and durable. Four 15 foot  heavy-duty ratchet straps, with a minimum load limit of 1,000 pounds and a break strength of 3,000 pounds, are sufficient enough to hold down the lumber.

How do you tie down lumber in a truck?

If you’re hauling a large load of long lumber, don’t rest it on a raised gate—it just can’t handle that kind of weight. For loads heavier than 250lbs, you will need to lower the tailgate and place down your first strap.  

Start by laying out two or more ratchet straps along the bottom of the bed and load the longest and heaviest lumber over the straps. Then stack shorter lengths on top. Secure the cab end, the middle and the trailing end with the straps.

Next, anchor the bundle to the truck bed with two ratchet straps. Crisscross the ratchet straps across the load, attaching one end to the cab end anchor rings and the other end to the farthest bundle strap.

Remember that tail swing can be dangerous if you have extended loads on a vehicle with a shorter wheelbase. Right turns can cause damage to the surrounding vehicles, so always be aware of what’s going on around you when turning.

3. Rent a Trailer or A Larger Truck 

While it can sometimes be frustrating, if the lumber load is too large for the truck, you’re going to need to get a bigger vehicle. Enclosed trailers, utility trailers, and box trucks can be the most successful way to properly haul a load to the dump. If you need one for only a short time, you can rent one. If you’ll be regularly transporting large loads that won’t fit in your vehicle, it may be worth looking into purchasing a trailer or larger truck. 

4. Extend the Bed

Instead of purchasing a new pickup truck with a longer bed length or a trailer, equip your current one with a bed extender. A bed extender allows for long cargo, like lumber, to be easily stored without fear of falling out of the tailgate. Installing a bed extender is one of the best ways to transform your truck into a highly functional workhorse. The ability to extend your truck bed by two to three feet allows you to carry and transport oversized items that otherwise wouldn’t fit. 

5. Get a Rack

A bed rack, sometimes called a ladder rack, is a versatile tool that can be placed on the top of your truck bed for extra room and carrying capacity beyond the tailgate. This extends the length of a load you can safely transport by allowing you to take advantage of overhang limits in the front and rear of the vehicle.

6. Try a Tonneau Cover

A heavy-duty tonneau cover can provide another platform for you to secure loads. These covers can be used in conjunction with bed racks. Some covers have built-in cleats for you to use when tying down and securing your load. They can also provide a little extra assurance that contents won’t fly over the tailgate when the vehicle is in motion. 

7. Flag it Up

If you’re carrying any volume of load, a flag is a good idea, but if you have an oversized load, make sure you mark it with a bright sign or flag. When objects protrude from the tailgate, make sure it’s within the limit by measuring.

How far can lumber hang from a truck? 

The amount of overhang a vehicle is allowed to have varies by state, so make sure you check what the allowed distance is in your state. According to the United States Department of Transportation's Federal Size Regulation law, commercial trucks' oversized loads are allowed to extend three feet in front of the vehicle, four inches on the side, and four feet in the rear. 

For good measure, a good rule of thumb is to mark your load if it extends a foot or more to the front, side, or in the rear. Getting into an accident on the road because of visual impairment or collision caused by cargo hanging over the tailgate is just about the worst-case scenario. Most flags are made of durable and weather-resistant material and are brightly colored to keep hazards visible. It should be fairly easy to find one, and to adhere it to your load. 

A backup or side camera can be helpful in these instances of oversized loads to help you monitor their clearance and avoid a collision. At Camera Source, we have some of the most affordable and easy to use cameras in the business, and if you shop with us, you’ll get great customer support too. Get in touch with us today for assistance. 

How to Determine SUV Load Capacity

SUVs are popular because of their cargo capacity, durability, and go-anywhere attitude. While it seems logical that large SUVs offer advantages without many negatives, many SUVs have a payload capacity that’s way lower than many buyers assume. When an SUV gets overloaded, the chance of it rolling over increases dramatically. This is why it’s important to know your SUV’s limits and treat it accordingly. 

For ease of use, if your car was built after September 2004, the tire label on the doorjamb of your vehicle will tell you what the maximum combined weight of occupants and cargo is for all vehicles with a GVWR (Gross Vehicle Weight Rating) of 10,000 pounds or less. 

In addition to their load capacity and being more prone to rollover accidents, it’s important to be aware of their other limitations, including their blind spots. These blindspots make a collision or accident more likely to occur when reversing the SUV. That’s why you need a backup camera. 

As the providers of high quality backup cameras, Camera Source is familiar with capabilities of SUVs and how to make driving them safer. You can start by being more aware of your vehicle and its surroundings by installing a backup camera. Keep reading for more information on how to determine your SUV’s load capacity and how to drive it safely, or start browsing our inventory of backup cameras for your SUV. 

Why You Should Never Overload Your SUV

There are many reasons to not overload your SUV. Here are just a few of the potential risks:

  • Bulging wheels and tire blowout
  • Reduced brake effectiveness
  • Suspension and traction control is compromised at highway speeds
  • Sudden steering can result in a rollover
  • Gas costs for extra hauling weight
  • No insurance payout in the event of an accident

But how do you determine if your SUV is overloaded? Make sure the weight of your payload is within your SUV’s payload capacity.

Terms to know When Determining Load Capacity

When determining the load of your SUV, there are a few terms that are helpful to know. 

Payload & Payload Capacity

Payload is simply the amount of weight in the bed and the cabin combined, and the payload capacity is the maximum amount of weight a vehicle can safely carry. 

How to Calculate Payload Capacity

A truck’s payload capacity refers to the maximum amount of weight you can safely add to a truck’s cargo area in addition to its empty weight (or curb weight). Additionally, if you’re pulling a trailer, the payload also includes the weight of the trailer pushing down on the trailer hitch, which is known as tongue weight. 

The Difference Between Payload & Towing Capacity

Payload capacity is the amount of weight a vehicle can carry, and towing capacity is the amount of weight it can pull. 

Towing capacity refers to the maximum weight that a truck can tow after factoring in the weight of the truck and any cargo. Subtracting the curb weight from the GCVWR gives you the vehicle’s towing capacity. 

Manufacturers will stress that you should never exceed your vehicle’s towing capacity. For safety reasons, it’s best to never come within 10% of that total. Automakers often refer to carrying weight in the bed of a truck as hauling to distinguish it from carrying weight in a trailer or towing.

GVWR

This term stands for Gross Vehicle Weight Rating. This is the amount the vehicle and payload capacity equal combined— ultimately the most a vehicle can carry safely. So, if you have a vehicle with a GVWR of 2,500 lbs, and the curb weight is 2,000lbs, you have 500lbs of payload capacity. 

The U.S. Department of Transportation (DOT)  groups classes of trucks into three categories based on GVWR:

  • Classes one and two are considered light-duty trucks
  • Classes three through five are medium-duty trucks 
  • Class six and above is a heavy-duty truck

The U.S. government classifies trucks into 8 weight classes based on the maximum GVWR: 

  • Class 1 6,000 pounds 
  • Class 2 10,000 pounds 
  • Class 3 14,000 pounds 
  • Class 4 16,000 pounds 
  • Class 5 19,500 pounds 
  • Class 6 26,000 pounds 
  • Class 7 33,000 pounds 
  • Class 8 Anything higher than 33,000 pounds

Your truck’s mass constitutes part of the GVWR, as does the load you carry. By subtracting the curb weight from the GVWR, you will find out how much additional weight your truck can handle. Knowing where your vehicle falls within these categories can make it easier for you to determine how much payload your vehicle can safely transport. 

Curb Weight

The curb weight of your truck is how much the vehicle weighs when empty. When determining maximum payload and towing capacity, you need to know the curb weight, which includes a full tank of gas and topped off fluids, but no passengers or cargo. 

Tongue Weight

This measurement indicates how much weight a tow load exerts on the truck’s tongue. Tongue weight only accounts for an empty trailer, you want to make sure you add cargo mass in as well. 

GCVWR

Not to be confused with GVWR, GCVWR stands for gross combined vehicle weight rating, which is the total combined weight of your loaded truck and trailer. You need the GCVWR to calculate towing capacity.

GAWR

Gross Axle Weight Rating is the maximum amount of weight one axle can support. Make sure to be mindful of this when placing a heavy load over an axle. 

GTW

Gross Trailer Weight is the total weight of your trailer and its cargo. If you were to place the fully loaded trailer on a scale, the resulting measurement would be the GTW. If your GTW exceeds your vehicle’s towing capacity, you will not be able to move it safely.

How Safely Increase Payload Capacity

You can increase your payload capacity, but it’s important to be careful, there’s a lot of bad information around doing this. Payload capacity is the sum of many different parts of a vehicle, and upgrading a single one doesn’t suddenly make the others stronger. 

Reducing the overall weight of the vehicle is the best bet. If you’re just needing a few extra pounds, removing the back seats can be a helpful trick. 

In the worst-case scenario, rent a larger vehicle. It’s not worth compromising the integrity of the vehicle, or risking your life and the lives of others, to increase your vehicle’s carrying capacity. 

Many SUV manufacturers, responding to consumer fears, have developed safer vehicles using electronic stabilizing technologies. These systems use computer sensors to cut engine power and brake individual wheels when they sense that the vehicle is losing control. While this won’t increase the overall payload capacity of your vehicle, it will make a heavy load safer to drive around with. 

Before you load up an SUV, make sure you know your vehicle and that it’s prepared for the trip. Know how much weight the vehicle can safely transport, how to use the tailgate, and make sure it’s equipped with all the necessary safety features, like electronic stability control and backup cameras. 

Backup cameras are great technology to help you be more aware of your surroundings and remain safe. Get in touch with Camera Source today, to see how you can start making your drive safer. 

9 Utility Trailer Tailgate Ideas

Utility trailers are useful and versatile vehicles, the tailgate of which can be easily modified to best suit your needs in landscaping, construction, and transportation. The tailgate is one of the key components of the trailer that affects its utility (in addition to the hitch and the trailer suspension).

There are plenty of ideas for improvements, from tailgate safety to cargo management — the first of which being a reliable and affordable backup camera from Camera Source — and we’ll go through them in this post.

Utility Trailer Tailgate Ideas

The ideas for ways to improve a utility trailer tailgate should be inspired by the type of utility trailer you have and what you plan to use it for. 

Types of Utility Trailers

As versatile as utility trailers are, there are a number of configurations and styles to accommodate a number of different uses:

  • Open-Air Trailers - Open-air trailers are what they sound like, open to the fresh air. These trailers feature durable and premium paint on all metal surfaces. Most open-air trailers have a heavy duty mesh ramp door and 2x8 plank floors. While these trailers are affordable, they often offer little protection from the weather and natural elements. 
  • Flatbed Trailers - Flatbed trailers are a type of open-air trailer with a flat deck, designed for easy loading and durability. They’re often used for transporting vehicles and other large items, and they’re available in multiple sizes and widths to meet the needs of a variety of tasks. 
  • Landscape Trailers - Landscape trailer designs are open-air trailers that are specifically designed to carry landscaping materials. These are the right types of trailers for items like shovels, lawnmowers and sod, for example. They usually feature tailgates that can double as ramps for easy loading of equipment onto the trailer. Tool racks and cabinets are also usually built into the frame for hauling small items like hand tools, along with larger equipment.
  • Enclosed Trailers - Enclosed trailers, like open-air trailers, are pretty self-explanatory. They’re secure, watertight, and have durable cargo box design. On top of that, they have a prefinished aluminum exterior. Many will also include a painted plywood floor. These trailers are designed to endure harsh weather and offer maximum protection. Because of this, they’re often expensive. 

Utility Trailer Tailgate Idea # 1: Backup Camera

No matter the kind of trailer you have and what you use it for, it can benefit from a backup camera. The backup camera is one of the most useful upgrades you can make to not only your utility trailer, but every vehicle. A backup camera for your utility trailer will help you back in and out of parking spots, navigate corners and obstacles, and set your mind at ease when reversing;

A backup camera for your car or truck can help you quickly and easily hitch your trailer to your vehicle with confidence; And a trailer side camera can help you when parking in a tight space or towing a long trailer through awkward job sites. For safety and convenience, there’s no better idea than a 360 degree view of your surroundings.

Utility Trailer Tailgate Idea # 2: New Tailgate Style 

There are several tailgate styles, many of which are useful for a number of different tasks. An upgrade to your utility trailer could be as simple as replacing the tailgate with one that is a different style to better fit your needs.

  • Drop-down tailgate - The most common design for truck tailgates features a drop-down mechanism that unlocks the panel and lays it flat, extending access to the flatbed or trunk. You see this on most pickup trucks. 
  • Swing tailgate - Another tailgate mechanism uses side hinges to provide access to the back compartment. This design requires adequate clearance at the back of the vehicle in order to swing the door open completely.
  • Split tailgate - This type has two separate door panels hinged on each side of the vehicle, allowing the doors to be opened barn-style. A split or double-hinged mechanism can be useful for operating in a tighter space where you can’t open a traditional drop-down tailgate.
  • Multi-way tailgate - Latest truck models feature gates that fold up and down, convert into a load stop, turn into a step, and double as workbenches to add functionality to the rear of the vehicle. A similar design can be adapted and used for a utility trailer. 

Utility Trailer Tailgate Idea # 3: Hinges & Latches

One possibility is to be able to detach your tailgate altogether. Being able to remove the tailgate comes in handy when loading and unloading awkward cargo, working in tight spaces, or when you have an oversized load that has some overhang in the back of the trailer. Removing the hinges and replacing them with latches or brackets will allow you to be able to detach and reattach the tailgate to the utility trailer with ease.

You may be able to remove the pins from the hinges and replace them with ones that can be easily slid in and out to detach and reattach the tailgate with ease. On some utility trailers, the pins are crimped or welded into place, or require pounding out with a hammer or mallet. If you can’t remove the pin you can replace the entire hinge. Some hinges are bolted on, making it easy to replace them, while others are welded on, preventing removal without grinding or welding. Latches can be used to replace the hinges as a mechanism to easily remove the tailgate and securely reattach it. 


Utility Trailer Tailgate Idea #4: Utility Trailer Lift Assist

Another handy tailgate upgrade, lift assists are simply struts that help support the weight of a tailgate, making it easier to lower or raise the gate. They’re easy to install, and they can often save your back from heavy lifting. 


Utility Trailer Tailgate Idea # 5: Tailgate Ramp

Ramps are one of the most useful transportation and utility trailer upgrades. They’re helpful for loading and transporting equipment, small vehicles, and large loads with ease. Ramps of different materials and lengths can be installed, including bifold ramps for extra length, ladder ramps, heavy duty ramps, and more. A variety of ramp styles are widely available, but if you have welding experience and tools, you can make a ramp yourself with these welding plans, and even with a few modifications to customize it to meet your needs. 


Utility Trailer Tailgate Idea # 6: Trailer Tailgate Winch 

You can use a winch to move a heavy item from the ground into the trailer without the need to do any lifting. Just wrap the strap around the item and use your winch to crank it into your utility trailer. If you want to free up the space a winch normally takes up, you can install a removable winch mount on your utility trailer. Using a removable mount for your winch also has an added bonus of keeping it out of the weather which will prolong its life.


Utility Trailer Tailgate Idea # 7: Trailer Bed Drawers 

Trailer bed drawers are exactly what they sound like: drawers that sit in the bed of a truck, or for our purposes, the bed of the utility trailer. They’re useful for organizing, storing, and accessing smaller tools, and they’re a great modification to a utility trailer, mainly due to their customizability. Adding drawers to your trailer will essentially turn it into a giant toolbox on wheels, which sounds pretty convenient for a number of tasks. 

Utility Trailer Tailgate Idea # 8: Tonneau Cover or Lid to Encase Trailer 

You can turn a utility trailer into an enclosed trailer with a tonneau cover or lid. These covers protect the trailer and its contents from the elements, and also allows you to lock and protect the contents of the trailer from potential theft.

Utility Trailer Tailgate Idea # 9: Lights

Lights are a bright idea for a vehicle, and we don’t just mean brake lights or taillights. While laws vary state to state, all trailers are required to have taillights, brake lights, side marker lights, turn signals, and side and rear reflectors regardless of size to be road legal. However, beyond that, additional tailgate lighting can help you safely navigate the trailer and its surroundings at different times of day in different locations. 

Even some backup cameras come with lighting, while others have night vision. Some cameras, like those included in the super duty plug and play kit and the 360 OEM camera kit, use infra-red LEDs that will create a daytime like display even in complete darkness. 

Protect Your Utility Trailer Tailgate with Camera Source

Enhancing the safety of your utility trailer is always a good idea. One of the simplest ways to do that is to install a backup camera, not only on your vehicle, but your trailer as well. Camera Source has all the accessories you need to make your vehicle safe. You can even get your choice of a square work light or a round work light, and we even have magnetic bases for your vehicle work light.

Camera Source has backup cameras to fit any need, and expert staff to help you determine which camera is the right one. Get in touch with us today!

Can a Truck Roll Over?

Can A Truck Roll Over

The Ford 2021 Bronco Sport recall has left some truck owners wondering how safe their trucks are, and has people asking if a commuter truck can roll over.

The short answer to this question is, yes. Light trucks, such as pickup trucks and sport utility vehicles (SUVs), can roll over. Trucks, unlike passenger cars, have a high center of gravity which puts both the driver and their passengers at risk for rollover accidents and rollover accident injuries.

However, the broader question is what is the risk of a pickup rolling over? In this post, we’ll talk through the causes of truck rollovers and the ways to prevent them. 

Can a pickup truck roll over?

Any vehicle can roll over if driven incorrectly, but certain vehicles like trucks and SUVs are more prone to rollover accidents. The same trucks that are prone to tipping over usually are also prone to blind spots and benefit from a backup camera. Backup cameras are great for larger vehicles for maneuvering in and out of tight spaces, around obstacles, or for towing trailers and hauling equipment. Checkout our inventory of high quality backup cameras to keep your truck, RV, or trailer safe. Camera Source offers a huge selection of high quality automotive cameras and accessories (reverse, heavy duty, front and side, bluetooth, and more!) for all the popular manufacturers:

If you can’t find a camera that’s designed for your specific vehicle, that’s not the end of the road. We have universal cameras that will work well on many vehicles.

What causes a truck to turnover?

Given the right circumstances, any vehicle can turn over. Taller, narrower vehicles like SUVs, pickup trucks, and vans are more susceptible to rollovers than traditional commuter cars because of their high center of gravity.  

When a truck travels along a curved path, centrifugal force causes it to lean away from the direction of the curve. This force increases when a vehicle rounds a curve, shifting the center of gravity of the vehicle with dramatic effects on the vehicle’s balance. The lateral forces increase with speed and also with rapid changes of direction. For example, when a driver makes too sharp a turn one way and then overcorrects the other way. Those transitions can set up a pendulum effect, with larger and larger swings and an eventual loss of control.

A single-vehicle rollover is usually not caused by a steering maneuver. Instead, the vehicle usually has to "trip" on something, such as when it swerves into a curb, pothole, or a soft roadside shoulder.

Causes of Rollover Accidents

Speaking of trips, there are two types of rollover:

  • Tripped rollovers happen when there are external forces at work, such as collision with another vehicle or object. 
  • Untripped rollovers happen because of cornering forces that destabilize the vehicle and can occur because of incorrect driving, bad terrain, or vehicular faults

The government has estimated that 95% of rollovers result from trips

The Types of Rollover Accidents

Aside from the more obvious scenarios in which a truck is at risk for rolling over, such as off-roading and rock crawling where trucks are lifted and overcome rough terrain and obstacles, there are scenarios in which a truck is at risk to turn over when in commute. 

  • Ramp Rollover: A truck can roll over if one side drives up a ramp or any other high object.
  • Lateral Force Rollover: When a truck travels at a fast speed around a curve, the vehicle can be forced into a roll because of its high center of gravity.
  • Sideways Skid Rollover: When traction is lost in the rear wheels of the truck, it can easily spin, resulting in its tires hitting objects and causing a rollover.
  • Site-Slope Rollover: When a truck drives off-road or unintentionally leaves a paved roadway, the uneven surface can cause it to roll over.

Driver Error & Reckless Driving

Regardless of obstacles, the most dangerous and common problem that drivers face is reckless driving, particularly frequently at curves in the road. These errors can include driving too fast for road and weather conditions, taking a ramp or curve too fast, driving while ill or tired, using mobile devices, or even just reaching for a drink or the radio controls.

Driving Too Fast To Safely Negotiate a Curve

In order to safely negotiate a curve, a driver needs to consider the height and load of their truck, as well as road conditions and the configuration of the curve. Going too fast for a curve can result in a rollover. 

Sudden Changes in Steering or Oversteering

Oversteering is when a driver uses too-large steering movements to control a vehicle on dirt or sand. While oversteering can help, on a regular road or when a vehicle regains purchase on the road, these broad turns can lead to increases in lateral force, which roll the vehicle. 

Improperly Loaded or Improperly Secured Cargo

A fully-loaded truck has a high center of gravity, so it’s very important that the load be centered and kept from shifting. Cargo that shifts as the truck is rounding a corner will upset the balance of the truck and increase its chances of tipping over. Speed also contributes significantly to truck rollover accidents when the truck’s cargo is not stable or properly loaded.

How to Prevent Truck Rollover Accidents: 7 Safe Driving Tips

Nobody wants to be in a car crash, but accidents happen every day. There are steps you can take to prevent accidents and decrease the risk of a rollover.

1. Learn to Safely Drive Your Truck 

Pickups and SUVs don’t require extra training or licensing to drive like large commercial trucks, but they are larger than other commuter vehicles. Safely driving a large commuter vehicle means:

  • Slowing down for curves in the road. One of the primary causes of rollover accidents is loss of vehicle control due to excessive speed.
  • Recognizing your visual limitations. Larger vehicles tend to have a greater number of larger blindspots than cars.
  • Avoiding sudden or sharp steering changes. Sudden changes in steering can destabilize the truck’s center of gravity and increase forces on it causing it to turn over.
  • Allowing enough space between your car and others. Give yourself space and time to react on the roadway so you can stop for hazards without taking collision avoidance maneuvers that increase your risk of a rollover.

2. Watch Your Speed

Drive carefully and avoid excessive speeding. Speed makes a vehicle's tendency to roll over more severe, and it also makes more demands on a driver's attention and skill. About 45% of fatal rollover accidents involve excessive speed. The faster you’re going, the less time you have to respond appropriately to hazards in the roadway and the harder it is to maintain control of your vehicle. 

  • Be aware of the conditions of the road. Wet roads reduce the traction that your vehicle’s tires can provide, sometimes resulting in a sideways skid that can be a precursor to a rollover. 
  • Be cautious when traveling on rural roadways that feature a lot of curves, few options for overtaking other vehicles, and a higher posted speed limit. Almost three-quarters of fatal rollovers occur in rural areas on roads where the speed limit is 55 mph or more.
  • Be alert for other drivers who may also be traveling the same roadway while not exercising the same measure of caution. 

3. Regularly Maintain Your Truck 

An important maintenance step to prevent a rollover in the event of an accident includes checking the tires. 

  • Make sure all the tires are in good shape and properly inflated to the pressure recommended by the vehicle manufacturer. 
  • Check the inflation pressure at least once a month, and replacement tires should be similar to the vehicle's original set. 
  • Under-inflated tires tend to run hotter than properly inflated tires, increasing the chance of a blowout that will make maneuvering your car very difficult.
  • Over-inflated tires, while providing some degree of additional stability for the vehicle, are prone to severe damage by potholes and other irregularities in the road which could lead to loss of vehicle control. 

4. Watch the Load

Carrying too much weight in any vehicle, particularly SUVs and pickups, decreases its stability. The worst practice is to place heavy loads on the roof. 

  • Try to stay well within the load ratings specified by the manufacturer. They should be noted in your owner’s manual. 
  • Try to place the heaviest cargo low on the floor and as far from the tailgate and as close to the center of the vehicle as possible.

5. Newer is Better

When shopping for a vehicle, look for a newer car that has the benefit of improved safety equipment, including electronic stability control and side curtain airbags. It makes sense to choose a vehicle with the most up-to-date safety systems, including a backup camera which can increase your awareness of your surroundings and prevent accidents, injuries, and damages.  

6. Don’t Drink & Drive

This should go without saying. Don’t consume alcohol if you’re going to be driving. Intoxication impairs drivers’ judgement and reflexes, which substantially increases your risk of any type of motor vehicle accident. By the same token, don’t drive if you’re overly tired. Fatigue produces similar symptoms as alcohol impairment in that it impacts your response time and your ability to control your speed.

7. Wear Safety Belts

This won’t reduce the risk of rollover accidents, but it may help you survive one. Seat belts keep you in the seat so you are not tossed around in a rollover crash. About half of rollover fatalities occur when people are partly or completely ejected from the vehicle. In all kinds of crashes, nearly three-quarters of people ejected from a vehicle are killed. Seat belt use reduces your risk of death by up to 45%. Buckle up and make sure all passengers are buckled up

Rollovers are far too common and dangerous accidents. Luckily, many new safety features are making trucks safer. A backup camera is a great safety feature that won’t prevent a truck from rolling over, but it can prevent you from rolling over a kid’s bike, or the family pet. Contact us today or start browsing our inventory

14 Travel Trailer Suspension Upgrades

Most Americans are probably familiar with travel trailers, fifth wheels, and RVs for road tripping, camping, or living the mobile lifestyle. The latest lifestyle trend is focused around minimalism and includes making adaptations like modifying utility trailers into travel trailers for living. Because they are used for living, the suspension is naturally the most important part of travel trailers and RVs. 

The suspension is the primary support for the load a travel trailer can carry, and when it breaks down, the entire structural integrity of your rig can be at risk. A faulty or broken suspension can result in the frame of a trailer being damaged, or even the floor of the trailer itself falling apart. Upgraded suspension increases your travel trailer’s load capacity, and it can also make your travel trailer ride a whole lot smoother, which saves wear and tear on your truck or SUV. 

That’s why this guide is here to help you determine the best upgrades to your travel trailer suspension for a longer lifespan and a smoother ride experience. Of course, any sort of major mechanical overhaul like this one needs to be approached with caution, so always refer to your owner’s manual or a professional if you need expert help. 

While you’re making upgrades to your travel trailer suspension, you should also consider upgrading your vehicle, travel trailer, or RV by installing a backup camera. Backup cameras make hitching and maneuvering large vehicles like RVs, travel trailers, and boats in and out of parking lots, camping sites, and around obstacles easier as well as safer for your vehicle and those around you. Camera Source offers the highest quality backup cameras for great prices. Start browsing our inventory to find the right truck backup camera, fifth wheel backup camera, and more!

Travel Trailer Suspension System Basics

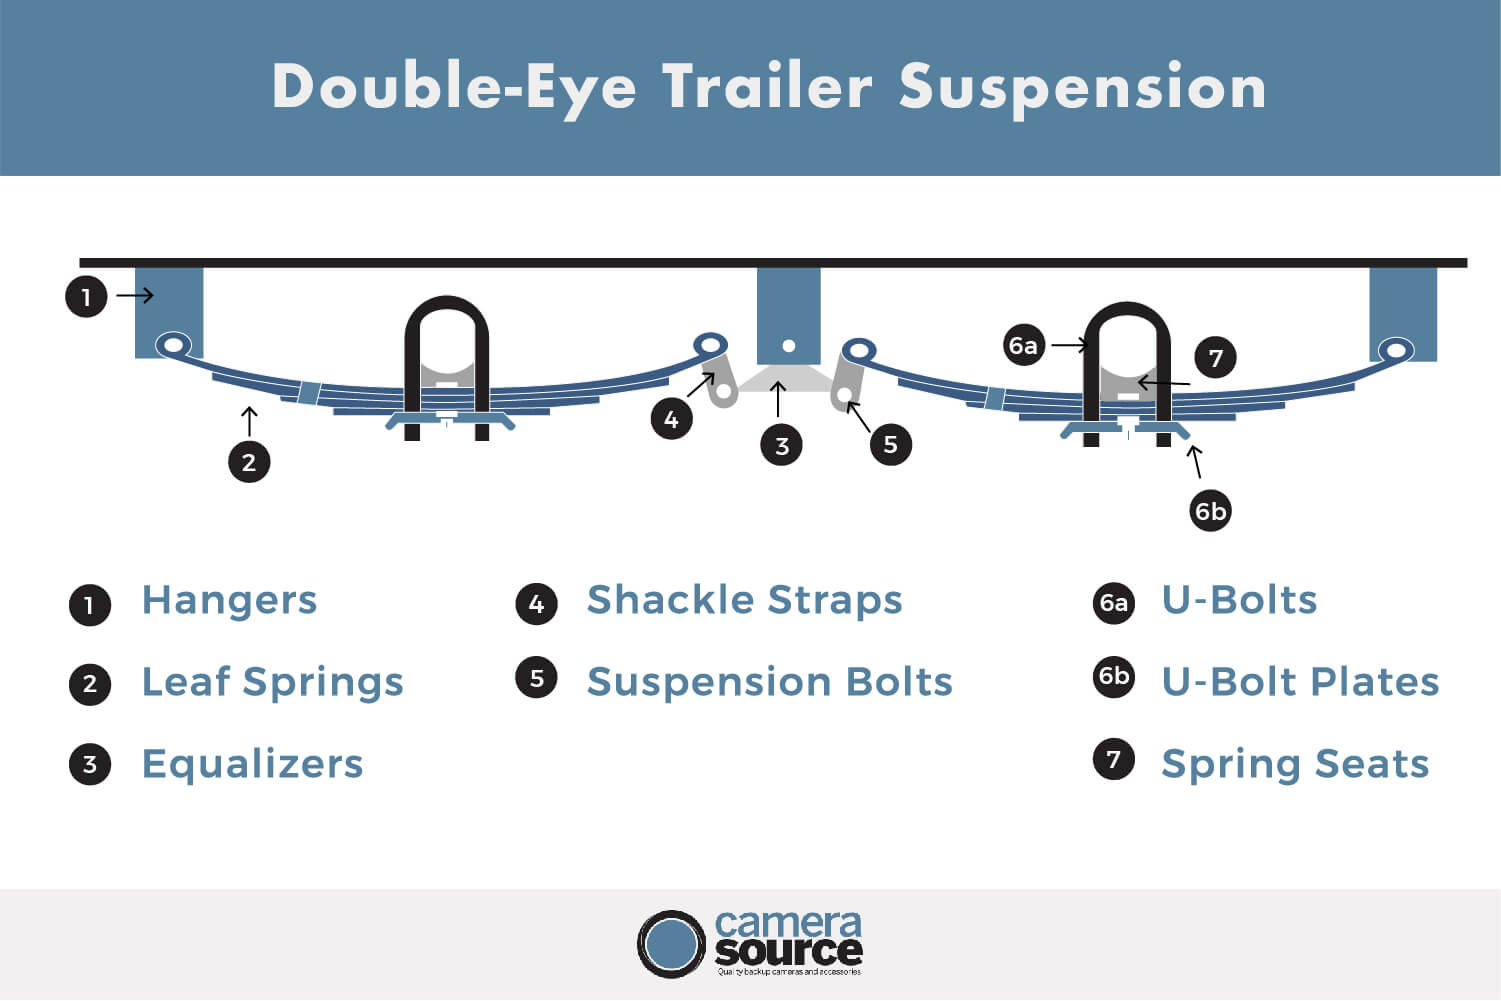
The common option for travel trailer and RV suspension is the factory-installed leaf springs and shackles. Leaf springs have been used in suspension systems for centuries, although modern manufacturing techniques have greatly increased their strength and reliability, as well as how smoothly or “softly” they do their job, compared to their medieval ancestors.

Leaf springs have a main spring with eyelets at each end and progressively shorter springs fastened by a center bolt. Leaf springs and shackles provide about two inches of vertical travel on your wheels. So what doesn’t get absorbed within that two-inch movement gets transferred into the frame, sidewall, cabinets, and cargo.

Reasons to Upgrade Your Travel Trailer Suspension

Leaf spring suspension systems have been around for years; however, they can be an antiquated system considering today’s travel trailers have become nicer and heavier while the roads have gotten rougher. 

Like other components of the travel trailer, over time the suspension will wear, reducing its effectiveness, and require maintenance or repair. Signs that it’s time to upgrade your travel trailer suspension system include:

  • The trailer leans toward one side.
  • One tire sits higher in the wheel well than the others.
  • The tires on one side of a tandem suspension are not the same distance apart as the tires on the other side of the trailer. 
  • Excessive turbulence or motion.
  • Clunking, grinding or creaking noises while being towed.
  • The trailer sways back and forth.

Although these conditions might be caused by the contents of the trailer being poorly distributed, they could also indicate broken or worn suspension components. 

14 Travel Trailer Suspension Upgrades for Longevity & A Quieter, Smoother Ride 

There are a number of upgrades that can be made to a travel trailer suspension to transport a heavier load or just to experience a smoother, quieter, more comfortable ride. The upgrades available will vary depending on the type of suspension your travel trailer has. 

When replacing worn suspension parts, consider upgrading to better components. Suspension upgrades are available from the original equip-ment manufacturer and aftermarket manufacturers. Depending on your travel trailer, suspension upgrades include:

1. Reinforce the Leaf Springs by Adding Coil Springs or Consider Upgrading to Air Springs

Most travel trailer and fifth-wheel suspension systems use leaf springs to cushion the ride because leaf-spring setups are mechanically uncomplicated and inexpensive. A standard two-axle RV suspension system has the leaf springs connected on each axle that provide the suspension travel. 

As your travel trailer experiences bumps or dips in the road, those leaf springs flex to try and absorb the road shock and prevent it from being transferred into the coach. The length, width, contour, thickness and number of leaves determine how stiff the leaf spring is and how much weight it can support. Additional coil springs or upgrading to air springs means more weight can be absorbed and redistributed with less wear.
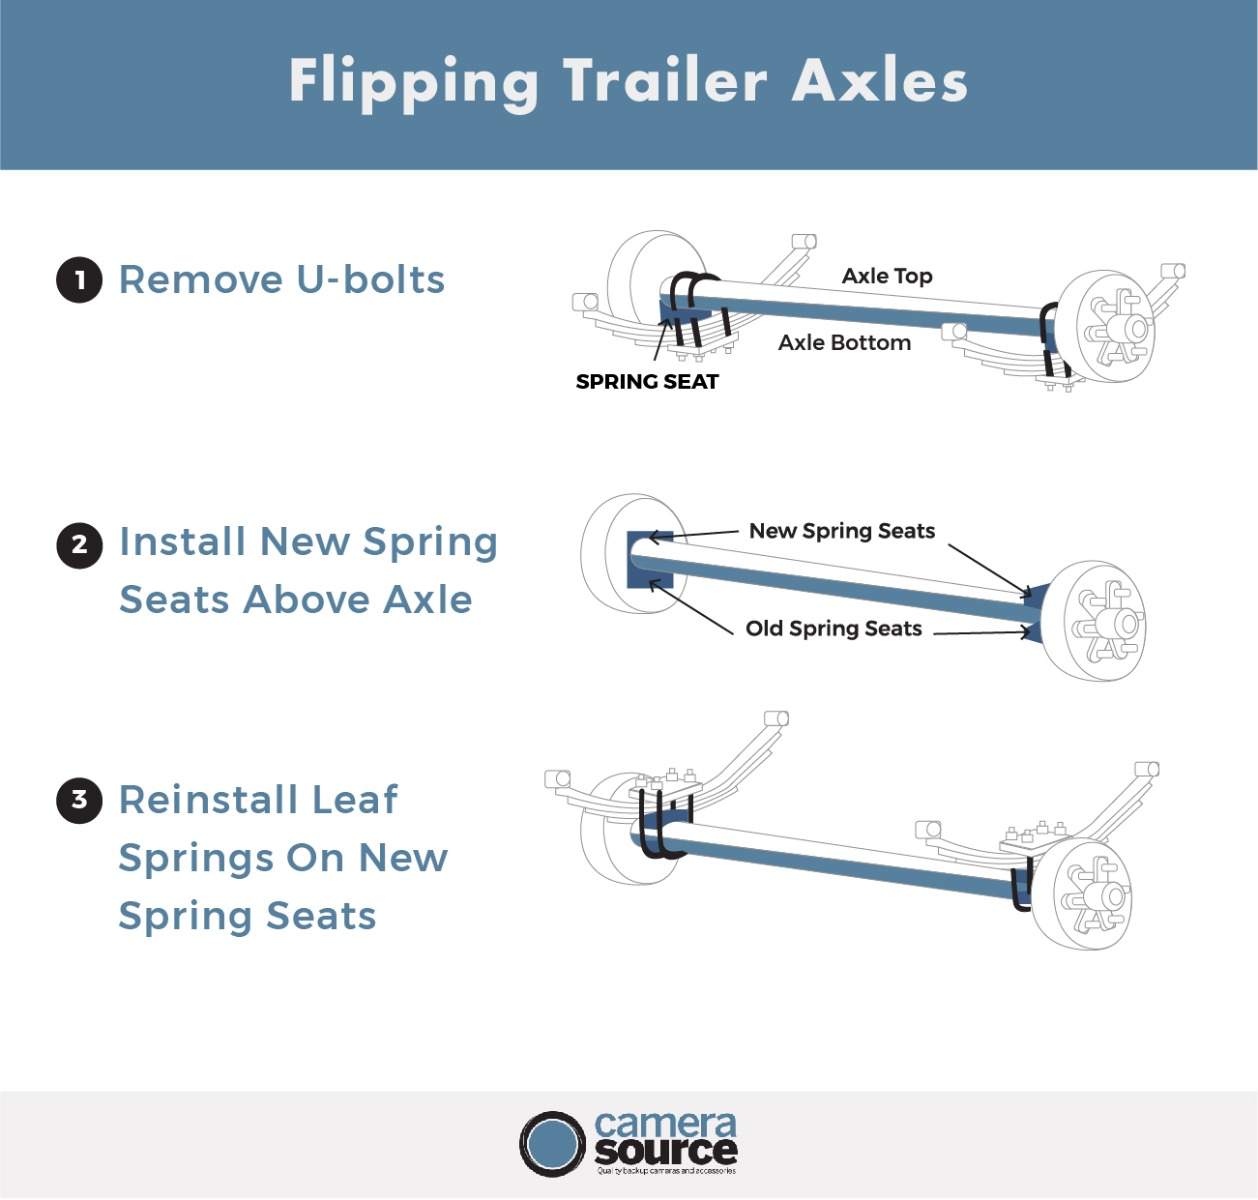
2. Flip the Axle

Leaf-spring suspension systems come in two configurations. Underslung suspensions are designed with the axle mounted over the leaf springs, while overslung suspensions have the axle mounted under the leaf springs. Underslung suspensions make the trailer sit a few inches lower to the ground, which helps lower the trailer’s center of gravity and somewhat lessens the effect of wind resistance while traveling. 

Although a lower stance might be beneficial when traveling on a highway, there are situations when it’s advantageous for a travel trailer to sit higher, such as when traveling off-pavement or being towed with a tall vehicle. A slightly higher travel trailer also reduces the chances that low-hanging hardware, such as the dump valves, will be damaged by road obstacles.

Axle-reversal kits provide all the hardware necessary to move an axle from over the leaf springs to under the leaf springs. Axle-reversal kits include new spring plates, spring perches and U-bolts. These kits allow the axle to be relocated under the leaf springs while maintaining its camber. Once you’ve flipped your axles, you’ll have more clearance for bumpier roads. 

3. Use a Lift Kit

Lift kits are pretty self explanatory. Similarly to flipping the axle, they elevate the trailer higher off the ground. While this is clear to anyone who’s ever seen a lifted truck, for instance, the reasoning behind why you might want to add a lift might not be as clear. 

Lift kits elevate the underside of your vehicle or trailer off the ground, which makes it far less likely for that part of the vehicle to be damaged or effected by ground debris and terrain. On top of this, the added clearance reduces the effect of dips and bumps. If you’re going to be taking a travel trailer over rough terrain that one may experience when camping and going on adventures, this is a no brainer. 

4. Align the Axle

Just like the tires on a car or truck, tires on travel trailers and fifth-wheels must be oriented parallel to the trailer’s frame for the suspension to stabilize the trailer and reduce turbulence. Worn or broken suspension components, a bent axle or spindle, improper axle installation, or an out-of-balance load can contribute to axle misalignment. In some instances, the misalignment might be obvious. If your travel trailer’s tires are wearing out prematurely, it’s likely a sign of poor axle alignment. 

Correcting axle misalignment may be as simple as balancing the load on each axle. When an axle has more weight on one side than the other, the leaf spring on the heavier side will compress and elongate more than the leaf spring on the lighter side, creating an out-of-alignment condition and a bumpier ride. Correcting the balance will correct the alignment, and allow for more stability and less wear and tear on the vehicle. 

5. Upgrade to an Air-Ride Equalizer or an Equalizer with Rubber Dampers 

Between leaf springs, you have a center rocker called an equalizer. This component rocks back and forth in the frame hanger to equalize the weight on your axles. Without this component, the weight would disproportionately shift to the lower axle as you drive over bumps in the road. 

Equalizers attach to a central hanger welded to the trailer’s frame. Shackle links and bolts connect the leaf springs to the equalizer and allow the springs to lengthen when compressed. Most travel trailers and fifth-wheels are equipped with triangle-shaped equalizers made of solid steel to stabilize the movement. 

You can upgrade to an equalizer that  includes rubber dampers that absorb road shock and vibration, improving ride quality and reducing wear. Another option are air-ride equalizers, which employ air bags to stabilize the trailer’s ride and reduce turbulence. The lack of contact between metal parts can help extend the longevity of your suspension’s effectiveness.  

6. Add Strut Braces

A strut brace or a strut bar is a metal rod that connects the front and rear strut towers of your vehicle to improve their rigidity. While this upgrade can be of questionable value to a car’s integrity, as strut bars only really improve certain types of suspensions, it can be of excellent use to a travel trailer. Trailer suspensions are often weak between the strut towers, but with an effective strut brace, you’ll avoid some of the damage that can occur when things start a’rockin. 

7. Upgrade to Air Shocks, Heavy-Duty Shocks, or Ride Adjusting Shocks

Air shocks, heavy-duty shocks, and ride adjusting shocks can provide a much smoother ride at the expense of having an additional moving part on your vehicle. Basically, most of these types of shocks use an air compressor to keep the suspension “floating” and absorbing shock. 

Air shocks and heavy-duty shocks can be a great pick for travel trailers, especially ones that will be carrying a heavier load. Their most common usage is found on semi tractor trailers, so it’s worth considering if you’re going to be headed over difficult terrain or bearing something heavy. 

8. Upgrade to a Heavy-Duty Shackle

The shackle assembly ties the factory-installed RV suspension together. The hardware that connects the leaf springs to the equalizer is called a shackle assembly. The industry-standard shackle assemblies are quarter-inch thick shackle plates with plastic nylon bushings and dry bolts. 

Over time the plastic bushings will begin to wear through, allowing metal on metal contact between the bolt and the leaf springs or equalizer. In turn, the bolt holes on the shackle plates can begin to wear. This could eventually wear to the point where they snap. This wear and tear on the suspension results in more turbulence. You can combat this wear and tear by upgrading to a heavy-duty shackle to keep your suspension in top performing condition. 

9. Replace Nylon Bushings with Bronze Bushings

If you’re not prepared to replace the entire shackle, you can start by upgrading its parts. Shackle bolts, spring eye bolts, and equalizer bolts all serve as pivot points in a suspension system. To reduce friction between the bolts and the suspension components, bushings — typically made of nylon — are inserted in the leaf-spring eyes and in the equalizer. Better-quality, higher-cost systems use brass or bronze bushings, and the suspension bolts include zerk fittings so the user can add grease as needed for maintenance. These reduce wear and tear and help reduce turbulence. 

10. Upgrade to Wet Bolts

A common upgrade is replacing nylon bushings with wet bolts. Wet bolts include brass or bronze bushings and greasable bolts. Why pick a wet bolt? Well, greasable bolts allow grease to be injected between the bolt and bushings, which results in longevity.  A general rule in the world of travel trailers is that greased and lubricated parts last longer and work more effectively than ones that are not. Wet bolts in your travel trailer ‘s suspension will keep it in optimal condition for reduced turbulence. 

11. Install Disc Brakes

Switching to disc brakes reduces your stopping distance by up to 30%. Disc brakes apply pressure on the wheels with more powerful and consistent force than drum brakes. This not only results in a shorter stopping distance, but a smoother stop in general. Additionally, disc brakes are a good choice because their self-contained design doesn't retain excess water, which not only prevents corrosion, but also doesn’t reduce their function when wet. 

12. Switch to Bigger Wheels

Similarly to a lift kit, bigger wheels provide more clearance to travel trailers. The added lift of larger wheels can create a cushioning effect that makes rides feel smoother and more secure. While the upgrades to your springs and shocks can do plenty to improve the overall performance of your suspension system, you can gain additional benefits by using bigger wheels. In fact, the upgrades can give your vehicle the needed clearance for a larger size of wheels.

Granted, there are other factors to consider apart from suspension when you add larger wheels to your truck. Oversized tires, for example, can boost the cushioning of your vehicle and allow you to get more mileage per gallon, but they also require more torque to spin. Consequently, the benefits you gain in certain areas could be offset in other ways with larger tires.

13. Install Shock Absorbers

Shock absorbers don’t actually absorb shock. In fact, they dampen the movement of suspension. When a travel trailer hits a bump, the suspension is compressed, moving toward the trailer’s frame, and absorbing the shock that road irregularities produce. 

Although shock absorbers play an important role in suspension systems, only a few travel trailers and fifth-wheels come equipped with them. Even though travel trailers are not built for passenger comfort, a rough-riding trailer is subject to premature wear and damage to its contents. Shock absorbers are a great upgrade to reduce turbulence and wear on the suspension. 

14. Replace the Leaf Spring Suspension with a Torsion-Axle Suspension Systems

Rubber torsion suspensions have several advantages over leaf springs. For starters, there is no metal-to-metal contact between moving parts, eliminating the chance of worn metal components. Rubber is used as a spring, creating a smoother ride with less vibration. Torsion-arm axles bolt to the trailer frame, making installation and replacement simpler. And by bolting directly to the frame, a torsion axle acts as a crossmember and adds strength to the trailer frame.

Torsion suspension systems are somewhat more costly, on average, than leaf-spring suspension systems. Unlike leaf springs, torsion systems are true independent suspension systems. Because torsion axles are designed to work independently, they do not provide equalization between the axles when used in a tandem- or triple-axle system. This provides more stability and less turbulence. 

Protect Your Travel Trailer (& more) with Camera Source

Following a regular schedule of inspection and maintenance will increase the reliability and longevity of any travel trailer or fifth-wheel. Installing upgraded heavy-duty components will pay dividends through decreased repair bills and less downtime. All of these add up to more miles of trouble-free towing.

On top of it all, a great upgrade to a travel trailer is a quality backup camera. At Camera Source, there are plenty of options, all available with different levels of features and price points. Get in touch with our experts or start browsing our travel trailer and RV backup cameras today!

The Guide to Tailgate Safety

Tailgate safety is important to think about no matter what environment you’re using your tailgate in. Tailgate safety refers to the safety procedures for activities that involve convening around a tailgate; for example, safely loading and unloading cargo, hitching and towing trailers, or hosting tailgating parties. These procedures are important to reduce incidence of accident, injury, or damages.

If you’re considering upgrading or replacing your tailgate, you should also consider upgrading it with a tailgate handle backup camera. Camera Source offers a wide range of high quality backup cameras, front and side cameras, and more to keep you safe on the road. Whether you’re on a construction site or pulling up for beers at the game, Camera Source has you covered with these top 14 tailgate safety tips.

Tailgate Safety: Risks, Concerns, & Hazards

The loading and unloading of cargo from a tailgate are activities which heighten the chance of accidents and injuries. Common hazards to be aware of when loading and unloading a tailgate are:

  • Truck drive-away - When drivers leave before the loading or unloading is completed.
  • Trailer creep - Unrestrained trucks creep forward due to movement entering and exiting the trailer.
  • Falling cargo - Heavy objects, wrongly distributed weight, unsecure fastening, obstructed view.
  • Water egress - Spills, wet loads, and incoming rain create slip, trip, and fall hazards.
  • Poor visibility - Reduced awareness of one’s surroundings increases the chances of accident and injury.
  • Clutter - The presence of clutter creates obstacles that make navigating loading and unloading difficult and unsafe.
  • Elevation - Trips and falls from heights have the potential to result in more severe trauma. 

These hazards can result in accidents, injuries, and damages. Some of the most common injuries related to tailgate loading and unloading include:

  • Sprains and strains from improper lifting or handling of cargo
  • Crushing injuries caused by colliding with a truck, falls from loading docks, or falling stacked materials
  • Bruises and cuts
  • Spinal injuries from improper loading, unloading, falls, or being crushed
  • Head trauma from falling cargo

14 Tailgate Safety Tips

Tailgate safety means being aware of your surroundings and reducing the presence of hazards and potential accidents and injuries. Below are tips and tricks on how to do that.

1. Install a Backup Camera

Safety starts with being aware of your surroundings, therefore the first tailgate safety tip is to get a backup camera for increased awareness and visibility. Tailgates are handy for loading and unloading cargo, as well as providing a surface area to perform tasks, like tailgating for example. But a busted tailgate can put a real damper on that and other activities. 

If a tailgate is damaged and fails during loading, people can be injured from falls or colliding with cargo. Even worse, a damaged tailgate fails during transit with a full load, releasing cargo onto the road. This is an opportunity for tragedy, with the potential to cause numerous damages and injuries to others. 

A backup camera provides peace of mind and can prevent damages to your tailgate when reversing your vehicle. Being able to see what’s behind you and in your blind spots makes maneuvering through tight spaces like parking lots, camp sites, and neighborhoods easier and safer for everyone. It also allows for precision and accuracy of movement to be able to perform tasks like hitching a trailer or around obstacles. A backup camera will help you protect your tailgate and everyone around you. 

Camera Source offers a huge selection of high quality automotive cameras and accessories (reverse, heavy duty, front and side, bluetooth, and more!) for all the popular manufacturers:

If you can’t find a camera that’s designed for your specific vehicle, that’s not the end of the road. We have universal cameras that will work well on many vehicles. Depending on what you’re looking for, there are plenty of aftermarket options that are very effective. An important factor to consider is how you want to mount the camera, as there are several backup camera mounting options available.

2. Keep it Lit

Similarly to using a backup camera, another safety strategy to increase awareness is to keep the area around the tailgate well lit. Don’t unload or load in the dark, especially if you have multiple people with you. It’s easier to trip, slip, or collide with people or objects when you can’t see your surroundings. A clear, well lit environment is one of the best barriers to prevent accidents and injuries. 

Additional tailgate lighting can help you safely navigate the trailer and its surroundings at different times of day in different locations. Even some backup cameras come with lighting, while others have night vision. And some cameras use infra-red LEDs that will create a daytime like display even in complete darkness. 

3. Stabilize

Trying to unload unstable cargo is one of the fastest tracks to injury. Make sure that the vehicle is stopped, braked, and stabilized when loading and unloading, especially in precarious situations. If the vehicle is on a slope, you’re more likely to experience difficulties or accidents and injuries while loading and unloading the tailgate. 

4. Remove Hazards

The tailgate and surrounding loading areas need to be free from tripping hazards and debris. A messy or unclean area is a recipe for disaster. Of course, that won’t always be an option, but making sure that the loading vehicle is stabilized in a hazardous environment will decrease the likelihood of an accident. 

5. Use Low Traffic Areas

Performing tasks at the tailgate in a crowded or uncontrolled environment like streets and parking lots can be dangerous. If possible, keep two-way traffic to a minimum in a loading area. People are much less likely to back into something or create an accident when there’s only one dimension to watch. 

6. Know Your Tailgate

Most people know what a tailgate is— a board or gate at the rear of a vehicle that can be removed or let down for loading— but not everyone is familiar with the different forms they can come in to allow for different uses. There are four common types of tailgates based on how the door opens. 

  • Drop-down tailgate - The most common design for tailgates features a drop-down mechanism that unlocks the panel and lays it flat, extending access to the flatbed or trunk. You see this on most pickup trucks. 
  • Swing tailgate - Another tailgate mechanism uses side hinges to provide access to the back compartment. This design requires adequate clearance at the back of the vehicle in order to swing the door open completely. Less common, but you’ll see it on jeeps and sometimes other utility vehicles.
  • Split tailgate - A split or double-hinged mechanism was designed for vehicles with tighter spaces that need access to the back, such as truck towing trailers. This type has two separate door panels hinged on each side of the vehicle, allowing the doors to be opened barn-style.
  • Multi-way tailgate - Latest truck models feature gates that fold up and down, convert into a load stop, turn into a step, and double as workbenches to add functionality to the rear of the vehicle. These are multi-use and are coming into more and more prominence.

Each type of tailgate has its pros and cons. Being familiar with your tailgate can help you identify and prevent potential hazards when loading and unloading. You don’t need to worry about a drop-down tailgate closing shut during loading like a swing tailgate might. Similarly, you should think about how much weight is resting on a drop-down tailgate, but not so much with a swing tailgate.

7. Secure the Load

Unsecured loads falling from vehicles during transit have caused more than 200,000 accidents, resulting in approximately 39,000 injuries and more than 500 deaths. Until the cargo is secured, properly arranged, and safe for transit, loading is incomplete. Make sure you and anyone working for you is briefed and understands how to properly secure a load. This may include the employment of ropes, straps, D rings, hooks, fasteners, and multiple anchor tie points. Lastly, always make sure the tailgate is closed all the way and securely latched or locked to protect both your cargo and others on the road. 

8. Handle Cargo Right

Not all loading has something to do with machinery. You should always practice proper handling for lifting, carrying, and moving heavy objects to avoid injury to yourself and others around you. Know your surroundings, lift with your knees, and identify where things need to go before lifting and make sure there are no obstacles between you and your destination. 

The tailgate is a great tool for loading and unloading because it provides a stable surface to transfer objects between the truck bed and the ground. It acts as a stopping point or place to pause if you’re struggling to carry something, and helps prevent you from straining to lift heavy or irregular things in and out of the bed. Listen to your body and know when to take a break, and when to get assistance when lifting something heavy. 

9. Know the Overhang

The amount of overhang a vehicle is allowed to have varies by state, so make sure you check what the allowed distance is in your state. If objects protrude from the tailgate, make sure it’s within the limit by measuring. According to the United States Department of Transportation's Federal Size Regulation law, commercial trucks' oversized loads are allowed to extend 3 feet in front of the vehicle, 4 inches on the side, and 4 feet in the rear. 

For good measure, a good rule of thumb is to mark your load if it extends a foot or more to the front, side, or in the rear. A backup or side camera can be helpful in these instances of oversized loads to help you monitor their clearance and avoid collision. 

10. Flag it Up

If you have an oversized load, make sure you mark it with a bright sign or flag. Getting into an accident on the road because of a visual impairment or collision caused by cargo hanging over the tailgate is just about the worst case scenario. Most flags are made of durable and weather-resistant material, and are brightly colored to keep hazards visible. It should be fairly easy to find one, and to adhere it to your load. 

11. Extend the Bed

Instead of purchasing a new or used pickup truck with a longer bed length or a trailer, equip your current one with a bed extender. A bed extender allows for long cargo, like lumber, to be easily stored without fear of falling out of the tailgate. Installing a bed extender is one of the best ways to transform your truck into a highly functional workhorse. The ability to extend your truck bed by two to three feet allows you to carry and transport oversized items that otherwise wouldn’t fit. 

12. Get a Rack

A bed rack, sometimes called a ladder rack, is a versatile tool that can be placed on the top of your truck bed for extra room and carrying capacity beyond the tailgate. This extends the length of a load you can safely transport by allowing you to take advantage of overhang limits in the front and rear of the vehicle.

13. Try a Tonneau Cover

A heavy-duty tonneau cover can provide another platform for you to secure loads. These covers can be used in conjunction with bed racks. Some covers have built-in cleats for you to use when tying down and securing your load. They can also provide a little extra assurance that contents won’t fly over the tailgate when the vehicle is in motion. 

14. Don’t Overload the Tailgate

Don’t concentrate a heavy load in the center of your tailgate. This is the weakest point, and can create buckling or bending. Make sure you know your tailgate’s maximum weight limit and don’t exceed it. Whenever you load something heavy, make sure you evenly spread out the weight across the tailgate. For instance using an appropriate ramp and ramp placement for large heavy objects like appliances, lawn mowers, motorcycles, ATVs, and other vehicles. Make sure that your cables and fittings for the hardware on the tailgate are up to snuff as well.

Protect Your Tailgate with Camera Source

Scroll back to the beginning of the tips, and you’ll see the number one tip and trick for tailgate safety-- a backup camera. Installing a backup camera on your vehicle will help keep your eyes where they need to be whenever you’re hitching, hauling, loading or towing. Camera Source has you covered with the highest quality backup cameras and accessories. Get in touch with us today. 

Enclosed Trailer Modifications

Enclosed trailers are highly versatile and highly modifiable vehicles. If you’re using your trailer as storage and transportation for landscaping, construction, or other tools and equipment, you may be familiar with some of the modifications to improve its functionality to make accessing cargo safer and more convenient. And if you’re not, then you’ve come to the right place! 

As the provider of high quality backup cameras and other automotive accessories, CameraSource is familiar with the customizations and modifications that you can make to your enclosed trailer. Keep reading to find out how to make your enclosed trailer safer and more accessible. 

What is an enclosed trailer?

Enclosed trailers, often called cargo trailers, are non-powered vehicles that are towed by powered vehicles like a car or truck. They are connected with a hitch, usually a two inch ball hitch, which allows for the trailer to move independently from the towing vehicle. These trailers usually come in widths from five to eight feet, and lengths from eight to thirty-two feet. Like regular utility trailers, an enclosed trailer must have brake lights and proper license plates in order to be road-worthy in the United States. 

Starting in 2018, all automobiles sold in the USA are required to have backup cameras. Since the rise of backup cameras in cars, the fatality rate of accidents involving cars reversing dropped 30%. Whie enclosed trailers are not automobiles and are not required to be equipped with backup cameras, they still benefit from the added safety of a backup camera. 

No matter what you use it for, if you have an enclosed trailer, you may have encountered situations where it’s difficult to maneuver in and out of tight parking spots, through awkward roads, or around dangerous obstacles on job sites. Just imagine how much easier and safer that would be with the enhanced visibility and awareness of a backup camera. 

Enclosed Trailer Modifications

Modifications will depend on budget, trailer size, and what you're using the trailer for, whether it’s for transportation or storage.

Enclosed Trailer Uses

The beauty of enclosed trailers is that they’re versatile. They’re ideal for any type of professional work that requires the transporting, safeguarding, and storage of equipment and tools.

Common uses for enclosed trailers are construction trailers, which are towed and hooked up to a job site to provide phones and electricity. They are also used to transport tools, equipment, and supplies that might be damaged by the elements. 

Enclosed trailers are also useful for transporting tools and supplies for hobbies and recreation. If you're an adventurous soul that is into motorsports like snowmobiling, four-wheeling, motocross or sprint cars, you can easily modify an enclosed trailer to transport vehicles and all kinds of equipment and tools for maintenance, repairs, or restoration. 

Other than transporting cargo, enclosed trailers can accommodate a range of uses for mobile businesses as workspaces or storefronts to sell concessions and other services and products. They’re also perfect for recreational use like camping. 

Modifications to an enclosed trailer are not too difficult. To use it for more than just moving items, you’ll need to consider how you want to customize it. 

Enclosed Trailer Safety Modifications

The main benefit of enclosed trailers is their security. They provide storage for safeguarding potentially valuable, fragile, or hazardous items (such as flammable chemicals, construction materials, or landscape equipment), from exposure to the elements, theft, or damages. 

For additional security measures you can implement simple modifications like fuel fill doors, or heavy duty latches and locks.

Backup Cameras

Whether you’re transporting cargo like construction or landscaping equipment, freight, or something else, having a suite of front and side cameras, as well as a backup camera, is essential for keeping your trailer safe. If you profession involves a trailer for construction, landscaping, or similar tasks, we recommend any of the following options for equipping an enclosed trailer:

Backup cameras can reduce accidents, and help prevent damages and injuries when maneuvering in and out of tight spots. When working on a tricky job site, the awareness that a backup camera provides is essential for safety. 

How to Keep a Trailer Cool & Safe

When using an enclosed trailer as a workspace or chemical and equipment storage, air ventilation and temperature control are important to monitor. Keeping a trailer cool and ventilated is easy with a few modifications:

  • If your trailer came with only one rear door, add a second door or a few sets of small windows or vents that can be opened for cross ventilation.
  • Install exhaust vents from all equipment to the outside.
  • Install at least one roof vent and if possible one with a temperature triggered fan.
  • Consider installing a small AC unit to run while you are stationary and have your equipment running.

If you’re using the trailer as a workspace, it is also a good idea to install a smoke and carbon monoxide monitor inside the deepest part of the trailer. 

Enclosed Trailer Cargo Control Modifications 

Enclosed trailers’ primary use is the storage and transportation of cargo. Modifications can be made to trailers to make doing so easy and safe:

  • E Track - E Track is a cargo control system that is designed to make tying down your load easier, especially in partially filled spaces to prevent cargo from shifting during transit.
  • D rings and anchor tie points - D rings and other similar tie and anchor points are useful for securing cargo and preventing damages when transporting it. 
  • Extended loading ramps - Extended loading ramps decrease the incline required to load objects onto a trailer, which means less physical strain when doing so. 
  • Racks, hangers, hooks, shelves, and organizers - For more specialized equipment, consider different storage systems to keep them secure and organized.


How to Create a Mobile Work Space in An Enclosed Trailer

In addition to modifications for safety and easy cargo management, consider modifications to make the trailer a usable workspace. You can add lighting, internet, electrical outlets, or counters so you can safely work inside it. Every enclosed trailer is a little different, so the electrical wiring process may vary depending on size, manufacturer, age, the voltage you want, and more. Adding electricity to an enclosed trailer is a little more involved than rewiring a utility trailer, but it is doable and can be worth the effort. 


How to Raise a Trailer

Raising a trailer is a solid idea for a number of reasons. You're less likely to bang your dump valve (or other important bits) on the ground, and you’re less likely to drag the trailer itself when pulling in and out of sloped terrains. It’s also easier to keep things level in a taller vehicle. 

The easiest way to do this is known as flipping your axles. Flipping your axles just means moving your suspension from below the axle (standard, "underslung" springs) to above the axle ("overslung" springs) in order to create more clearance between the underside of the trailer and the road.


Enclosed Trailer Modifications for Living & Camping

Tiny houses and minimalism are an increasingly popular lifestyle that more people are adopting in response to environmental and economic conditions. Modifying a trailer for camping and living usually involves an entire conversion. Living in an enclosed trailer can be a difficult challenge, but there are plenty of modifications you can make to the small space to feel more like home. 

Enclosed Trailer Camping Conversion

For some people, it’s easier to make the upfront investment in a ready made RV or camping trailer. Others prefer a DIY approach to save on costs. Meanwhile, others enjoy having a project, or want special customizations with certain specifications. 

In addition to adding electricity, lighting, and outlets, cutting out windows, installing kitchen appliances, and adding insulation are all modifications that can be made to an enclosed cargo trailer to transform it into a livable trailer. It’s important to prioritize practical and space saving modifications like multi purpose appliances, or convenient storage. 

For camping, upgrading an enclosed trailer to have a toilet, shower, and sink are good modifications, though they often require more sophisticated work (installing water lines for instance). In a pinch, a chemical toilet will work just fine. If you’re going full camping mode, a bed is usually a must have first step, along with basic kitchen equipment and other cooking appliances. 

Overall, one of the most important features to include on an enclosed trailer for camping is a winch. You never know when you’ll get stuck or need to pull something out, so it’s always a good idea to have an electric winch installed if possible. 

For most cargo trailer to camper conversions, you’re looking at an investment between $5,000 and $15,000 in total for the trailer and build. This will vary depending on the design and amenities you are looking for and how much you want to do yourself compared to getting professionally installed. 

Camera Source for Vehicle Safety Modifications 

Any vehicle can benefit from the added safety and convenience that backup cameras provide, and the same is true for enclosed cargo trailers. Whether it’s hitching up a trailer, backing in and out of tight spaces, or checking blindspots when driving an RV, Camera Source has the tools to help drivers reverse with confidence and ease.

When life takes you on the move, be prepared for whatever the road throws your way with Camera Source’s wide collection of high quality backup cameras and helpful expertise. We’ll help you solve any problems the road throws your way. Get in touch with us today. 

12 Mobile Home Upgrades

Since the 1950’s, mobile homes have been providing inexpensive housing across the U.S. The modern mobile home has come a long way since then, starting as small units with wheels, now they are “ten-wides” with permanent foundations. If you have an older model, or have noticed some wear and tear from years of living life to the fullest, upgrading your mobile home with the latest improvements is one of the best ways to make it last for years to come. We’ll go over some of the most popular upgrades available to a mobile home owner. 

If you're thinking of moving your mobile home to a new location, make sure that your company is using great commercial rear view camera systems for maximum safety on the road. Or,  if you're not used to your new carport yet, backup cameras on your cars can be a great upgrade to make sure you're not getting running into trouble while backing out into traffic, or into your spot.

What is a mobile home? 

Mobile homes are manufactured or mass produced structures. Sometimes known as a trailer home, house trailer, trailer, or residential caravan, they’re transportable, prefabricated structures, often placed in one particular location. Manufactured homes are often used for the gamut of living conditions. They can be vacation homes, temporary accommodations, mobile work spaces, or permanent residences. 

The great thing about manufactured homes is that they can be placed in a number of locations in a shorter timespan and with fewer expenses than it would take to build a brick and mortar home in the same location. This can make more locations viable residential options for more owners. Prefabricated homes are compact, affordable, and with the right touches, a lovely place to live. 

Mobile Home Upgrades

Many of the upgrades that apply to a fixed home often apply to a mobile home. You’ve got interior and exterior upgrades, as well as upgrades that increase comfort, durability, improve appearance, and overall make the entire experience more enjoyable. 

The appeal of prefabricated homes are their cost savings as prefabricated, modular structures. Since manufactured homes are mobile, weight is an important factor to consider. That being said, they are typically made from lightweight, lower cost materials that aren’t as durable as other building materials. This prompts owners to make upgrades to make them both more attractive and more durable. 

That being said, while choosing upgrades to a prefabricated home, it’s important that those upgrades align with the quality of the rest of the home. In other words, you don’t want to make too many expensive upgrades with expensive materials when the base of the structure itself is inexpensive. 

The four things to factor into choosing materials for a manufactured home are:

  • Cost
  • Weight
  • Durability 
  • Appearance 


Upgrade #1. A New Location

The first upgrade to consider making to your mobile home is one that can’t be made to a fixed home. As most homeowners know, location is key when it comes to choosing a home.  One of the benefits of a mobile home is the flexibility it provides. Instead of an owner having to choose between keeping a house they like and moving to a better location they can have both! 

While mobile homes aren’t meant to be regularly transported to multiple locations like an RV, they can be relocated to a new site. There a number of reasons why a homeowner may want to relocate their manufactured home to a new site:

  • More quiet area
  • Safer neighborhood
  • Closer proximity to amenities
  • Shorter commute to work
  • A nicer view than before
  • Better soil conditions for gardening 

Moving a mobile home to a new site can be a dramatic upgrade for inhabitants, and it is only one of many possible upgrades. If you do choose to relocate your manufactured home to a new site, make sure you do it safely. 

Tools like backup cameras and front and side cameras make moving large vehicles, trailers, boats, and other cargo easier and safer. Start browsing our inventory or get in touch with any questions or concerns you may have.

Exterior Mobile Home Upgrades

Below are some of the most common upgrades made to mobile homes that people recommend to increase their lifespan and durability. 

Upgrade #2. New Siding 

Siding is cladding material to protect the exterior of structures. Improved siding increases the longevity of the mobile home, as many homes come with lower quality exterior siding. Prefabricated home siding materials include:

  • Vinyl - Vinyl siding is a popular choice for both brick and mortar as well as manufactured homes because it’s durable, cost effective, light, and can be attractive. 
  • Wood - Wood siding is another popular choice for both brick and mortar homes as well as manufactured homes because it’s attractive, durable and cost effective. It’s not as durable as vinyl siding and requires more maintenance, it is easy to repair if damaged. 
  • Metal - Aluminum or steel siding are durable, light weight, and cost effective. It’s a less popular choice for cosmetic preference, giving some people the impression of living in a “tin can.
  • Fiber cement - Made from mixing cement, sand, and cellulose fibers, fiber cement siding is heavier, and more durable and expensive than vinyl siding. Many people find it more attractive than vinyl siding. 
  • Brick , stone, or stucco - While these are traditionally attractive and high quality choices for brick and mortar structures, their weight and cost are not the most logical choice for a manufactured home.

When replacing a prefabricated home’s siding, homeowners may want to consider adding or replacing house wrap, vapor barrier, exterior sheathing, or backer board. When installed correctly, these products can increase your home’s lifespan and comfort. The added costs of these mobile home upgrades are a good investment because they can be easily recouped with lower energy bills and a studier home. You can learn more about prefabricated home siding options from Mobile Home Living

Upgrade #3. New Exterior Doors 

Curb appeal is important for mobile homes too!nA new door can be a nice way to spruce up a mobile home. Improving the exterior doors can also improve heat retention and overall security of the home. 

Upgrade #4. Porch or Deck Addition 

A deck is both an attractive architectural feature, and a usable space for entertaining. When constructing additions to the structure, make sure the materials and style match the rest of the home. 

Upgrade #5. New Roof 

You want to have a good roof over your head! Roofing options will vary depending on whether your roof is flat or pitched, as well as other specifications of the home. Mobile home roofing materials include:

  • Aluminum - Aluminum roofs are energy-efficient, lightweight, and durable. Aluminum cannot be used alone, and instead works with another material that works as an insulating layer.
  • Rubber- Seamless rubber roofing is an affordable roof over option that can be installed quickly by coating your existing roof with a thick layer of liquid rubber and then allowing it to dry. Rubber roofing is naturally waterproof and resistant to impact damage when properly installed. 
  • Membrane - An affordable option, thin sheets of polyvinyl chloride (PVC), thermoplastic polyolefin (TPO), or ethylene propylene diene monomer (EPDM) are bonded to the original roof. All three materials create a watertight seal, and they vary in composition and longevity. 
  • Asphalt shingles - A layer of asphalt or composition shingles can be applied to a pitched mobile home roof. They’re durable and cost effective, but also heavier than other options. 

It may be time to consider getting a new roof if you notice leaks, water damage, mold, or an increase in energy consumption. 

Energy Efficient Upgrades

One of the best things to do to a mobile home is increase its overall efficiency. Not only does this pay in cost savings, it’ll also increase the overall comfort of the home. Here are the best and most common upgrades:

Upgrade #6. Insulation 

Insulation is important to home to keep it cool in the warm weather, and warm in the cool weather. This increases comfort while also decreasing energy consumption, which saves you money. Insulation isn’t just for heat though, insulation can also affect noise levels. Many manufactured homes could be improved by replacing or adding insulation for increased efficiency and comfort. If you’re being bothered by excessive noise such as the wind blowing on the home, or nearby traffic or people, this is a good sign you may need additional insulation. 

Upgrade #7. Windows 

Windows are significant to a home’s energy usage, as well as its overall ambiance and comfort. Having many large windows can make a home feel bigger, brighter, and more open. Whereas fewer or smaller windows can make a home feel cozy and private. A lot of design goes into windows to provide proper insulation and a clear view. 

Windows can reflect sunlight, keep moisture out, keep hot and cold air in, and temper sound to regulate heat and insulate interior and exterior noise. New windows can prevent leaks, improve heat retention, and provide a nicer view. If your windows leak, are drafty, or sunlight heats the surrounding area, you should consider replacing your windows. 

Upgrade #8. Solar Panels 

Alternate energy is an increasing demand in the housing market. Solar panels can be installed on the roofs of mobile homes to reduce their utility bills. While some people don’t like the appearance of solar panels, they are becoming increasingly discreet. 

Interior Mobile Home Upgrades

Interior upgrades can be equally important as exterior ones for comfort, efficiency, and functionality. 

Upgrade #9. Lighting 

Improving the lighting in your mobile home can dramatically improve the interior living space. When there’s well-lit and tastefully arranged lighting, it can make the space feel larger, more comfortable, and overall make everything easier to see for everyone. Poor lighting can make a space feel small and dark, or be too bright and intrusive to your eyes. 

Upgrade #10. Cabinets & Countertops 

Cabinetry and countertops make a big impact on a room, both in form and function because they are regularly well within view and frequently in use. More cabinets equals more storage space. More counter space equals more surface space for tasks and displaying decor. 

Wood, laminate, and ceramic are durable, affordable, and lightweight countertop options. Stone countertops like granite, quartz, and marble are more durable and attractive, but also heavier and more expensive. 

Upgrade #11. Flooring

People don’t usually tend to think too much about what’s beneath their feet, but the truth is, flooring makes a huge difference in a home’s comfort, appearance, and even its health. Flooring options for a mobile home are the same as that of a traditional home:

  • Carpet - A lot of people install carpet for the warm soft feeling it adds to the room as a whole, as well underfoot. However, some people are bothered by the problems carpet poses in regards to sanitation and allergens.
  • Hardwood - Hardwood floors are desirable to most homeowners, though they can require more maintenance than other forms of flooring. Hardwood is not the first choice for mobile homes due to their higher cost. 
  • Tile - TIle is not the best choice for mobile home flooring because mobile homes tend to have a level of flex in their structure that can cause the tile to crack. If the mobile home was made with tile as the original flooring, then it can be replaced with another tile. 
  • Laminate -  Laminate flooring is very popular in many homes for a number of reasons, and it’s a great flooring choice for mobile homes. It’s easy to install (can be installed on top of existing flooring, which can also increase insulation), it’s affordable, durable, and can resemble hardwood floors.

When replacing flooring, be sure to check the condition subflooring to see if it needs replacing. Putting in new flooring to replace stock floors in a mobile home is an upgrade that can make a whole room more comfortable. 

Upgrade #12. Fixtures & Appliances

Light and plumbing fixtures can be thought of as the cherry on top of the sundae. They’re small details that can make a big difference since they’re commonly interacted with throughout the day. Matching appliances and fixtures can pull a home together for a cohesive and luxurious appearance. 

How much does it cost to update a mobile home?

Like anything else, costs vary dramatically based on location, size, materials, models, condition, labor, and many other factors. Manufactured home upgrades, renovations, and remodeling can range anywhere from $1,000 to over $50,000. 

The cost to move a manufactured home can range from $1,000 to upwards of $20,000. The cost will depend on many factors, including the condition of your home, the size, the distance of the move, and more.

  • If you’re moving your manufactured home less than 100 miles, it can usually cost less than $5,000. 
  • For longer moves, you can expect extra fees of $6 to $15 per hour for transport.

Camera Source for Your Mobile Needs

If you're using your mobile home as your headquarters while traveling frequently, or backing in and out of tight quarters, a back up camera can be a life saver. Having a high quality RV backup camera and front and side cameras is the best way to keep an eye on your entire home while repositioning or moving. We have an enormous selection of different cameras. Consider making your first upgrade a backup camera, and get some peace of mind. 


Copyright 2022 © Camera Source. All rights reserved. Privacy Policy and Cookie Policy | Enable Cookies